Who doesn't like salsa on a camp trip? No one I know! One thing we consistently try to avoid is packing glass bottles of anything. Cans are the way to go for us. It's EZPZ for a glass bottle to break and well...that's not a good thing on a camping trip.
Salsa has never been sold in a can. It's ALWAYS in glass bottles. But you CAN get close in a can. Check out something generally called "Fire Roasted Tomatoes Salsa Style." It's not easy to find and it's not ordinarily cheap either.
But once in awhile, we get lucky. Who doesn't love gittin' lucky? Today we found a digital coupon at Albertson's for $1.04 for a 14.5 ounce can of the Good Stuff.
We generally add some dried chile flakes, dried hot chile powder, cumin powder, dried oregano and maybe some granulated garlic to this canned stuff. Of course that depends on who we're camping with. Some folks don't like the hot stuff. We forgive them.
This stuff easily passes for salsa right out of the can so adding all of the above could be redundant. YMMV.
Anyway, we're fully stocked up on canned salsa for our next camping trip. It's wonderful peace of mind not to have to worry about a glass bottle breaking. Ugh.
Thursday, September 21, 2023
Monday, June 5, 2017
Tick Tock...Tick Talk..
If you've ever hiked in Tick Country, you well know about the scourge of ticks. Ticks are serious stuff. They carry wicked diseases, including the dreaded Lyme Disease. Lyme Disease can be Life Changing to some people. Ticks scare us worse than bears. Why? Well, your chances of having a life-changing encounter with a bear are very slim. However, every time you hike in Tick Country, you are literally risking a life-changing experience. You can carry bear spray for the bruins and it works quite well. But how do handle ba-zillions of ticks?
Before we get into talking a "tick solution" (literally), we'd like to scare you some more with tick stuff from the experts including Center For Disease Control, Mayo Clinic and the Lyme Disease Association.
http://newsnetwork.mayoclinic.org/discussion/be-aware-of-signs-and-symptoms-associated-with-tick-related-diseases/
https://www.lymediseaseassociation.org/about-lyme/other-tick-borne-diseases
OK, now that you are sufficiently impressed with just what kind of really bad things can happen to you from ticks, it's time to talk the absolute best Tick defense: Permethrin. If you venture into Tick Country, you really need to get yourself some Permethrin and learn how to use it properly. Here are two decent resources on Permethrin:
As we prep to head to Tick Country this week, we're getting all our clothes treated and ready to wear. Here's the Amazon link (shortened) to the best deal on bulk Permethrin. We have been using this concentrate for 4 years.
Here's how we use it. First, we prepare a very dilute solution similar to the concentration sold by Sawyer. We make up 3 gallons and place the 3 gallons in a five gallon pickle bucket. We then place ALL of our hiking clothing (including socks and underwear) in this solution and let the clothing items sit for at least 12 hours. The idea is to impregnate every molecule of every thread with the permethrin. We use rubber gloves on our hands to hand wring each of the clothing items. We put them on a line to air dry outside. We carry some of the dilute solution in a spray bottle so we can spray our boots before each hike. We wear calf-length socks and use velcro to close up our pant legs at the ankles. If we are in Heavy Tick County, we wear cheap-o cotton gloves purchased at the dollar store. We also wear a cotton scarf and a wide brim hat. ALL items we wear are soaked in the solution.
This stuff just doesn't repel ticks, it kills them on contact with the treated clothing. We haven't had a tick on us ever since we started using this method.
Permethrin is safe to most mammals except cats. It can be lethal for cats. You can begin reading up about permethrin here:
https://en.wikipedia.org/wiki/Permethrin
DISCLAIMER: Use at your own risk. We consider permethrin to be safe. However, user discretion is advised and recommended. The information here is presented solely as our own personal opinion and does not constitute medical advice. Consult available technical resources and consider asking your physician if permethrin is safe for you.
This stuff just doesn't repel ticks, it kills them on contact with the treated clothing. We haven't had a tick on us ever since we started using this method.
Permethrin is safe to most mammals except cats. It can be lethal for cats. You can begin reading up about permethrin here:
https://en.wikipedia.org/wiki/Permethrin
DISCLAIMER: Use at your own risk. We consider permethrin to be safe. However, user discretion is advised and recommended. The information here is presented solely as our own personal opinion and does not constitute medical advice. Consult available technical resources and consider asking your physician if permethrin is safe for you.
Saturday, June 18, 2016
Onboard Fire Extinguisher
I've always wanted to carry a small fire extinguisher in the cab of our camping truck--a 1984 Nissan 720 4WD king cab. However, everything in that cab is so cramped and there's essentially no place to rig a fire extinguisher. Today, we finally solved that conundrum. We bought a small $10 Kidde Marine Model Mariner 5 fire extinguisher and simply bolted the retaining device to a milk crate. The crate has been a fixture in the truck for as long as we've owned it. Now the extinguisher stays put, upright in the same spot and is readily accessible behind the driver's seat.
As you can see, it's firmly attached to the milk crate. No wiggling, wobbling or whatever.
Fits nicely behind the driver's seat. The seat goes all the way without hitting the extinguisher.
Very easy to get to behind the driver's seat.
Thursday, June 2, 2016
Camp knives
We've always had problems with camp kitchen knives. They are hard to store and can cause all sorts problems. A few years ago, we decided to simply cut off the sharp tips and shorten the knives to fit the 50 caliber ammo can in which we keep all our other camp utes.
Well, that worked great until realized fugitive dish water hides in the handles of those knives. We all know what stray water can do. Think mold and bacteria. So, this week we went to the thrift store and picked out two knives that are essentially waterproof.
We figured this would be a good time to explain the process so here ya go.
Here are the two knives we found for $2 each at our local Deseret Industries thrift store. There's no place for dish water to hide in the one-piece, molded plastic handles of these knives.
The new knives have two problems; 1) Sharp tips and 2) Too long to fit an ammo can.
So, we square the knives up and mark the proper place to cut.
A hack saw can cut through most knives. If not, a bench grinder will do the job.
Good-bye sharp tip. If you've ever had a sharp knife tip fall and stick in your flip flop foot, you well know how such an incident can ruin a perfectly good camping trip!
Then, you simply smooth the blunt end of the shorty knife, round and smooth the corners and you're good to go.
The new knives are perfectly at home in the 50 caliber ammo can utes box.
Well, that worked great until realized fugitive dish water hides in the handles of those knives. We all know what stray water can do. Think mold and bacteria. So, this week we went to the thrift store and picked out two knives that are essentially waterproof.
We figured this would be a good time to explain the process so here ya go.
These are the former camp knives. They're great knives and will continue in use in our travel trailer where there is sufficient air flow and ventilation to help the knives dry out after washing.
The problem with the former camp knives is that water would get trapped between the handle pieces and the blade. When put into an airtight ammo can, well, use your imagination!
Here are the two knives we found for $2 each at our local Deseret Industries thrift store. There's no place for dish water to hide in the one-piece, molded plastic handles of these knives.
The new knives have two problems; 1) Sharp tips and 2) Too long to fit an ammo can.
So, we square the knives up and mark the proper place to cut.
A hack saw can cut through most knives. If not, a bench grinder will do the job.
Good-bye sharp tip. If you've ever had a sharp knife tip fall and stick in your flip flop foot, you well know how such an incident can ruin a perfectly good camping trip!
Then, you simply smooth the blunt end of the shorty knife, round and smooth the corners and you're good to go.
The new knives are perfectly at home in the 50 caliber ammo can utes box.
Sunday, May 31, 2015
What's in those tubs?
About 35 years ago we realized "containerized camping" was the way to go. Everything has its place.
So, what's with the Year Twenty Fifteen rig? What's in those tubs?
First, the two small blue tubs are "truck stuff." One tub holds tools and two Nissan repair manuals. The other holds all the vital fluids a truck might need--antifreeze, oil, power steering, brake fluid and more. We also travel with two spare tires, a custom lug nut breaking bar and a high flow air pump.
OK, here's the contents of the nine gray tubs:
- Tent
- Cooking utensils
- Food
- Coffee
- Share rain gear
- Susun clothes
- Susun hike stuff
- John clothes
- John hike stuff
Note that we hold coffee in such high regard it gets its very own tub all to itself. Coffee is definitely not an afterthought with our camping rig!
The six gallon milk crate holds all the tie down material to pitch a tarp. The three .30 caliber ammo cans hold:
- Eating utensils
- Spices
- Bear Spray
A separate metal box hold a variety of mosquito, gnat, and tick repellents. We call it The Bug Box.
Our early 1950's Coleman stove is large enough to hold all kinds of stuff, including three propane fuel canisters and related flotsam and jetsam.
By the time everything else gets added this year, we probably won't be able to see through the rear view mirror. Also, because we're carrying the canoe, our fuel economy will be terrible. But what are summers for if not for camping, boating, hiking and enjoying the IdaWy outdoors?
Thursday, July 31, 2014
Stealth Cam G26NG Review
We purchased a Stealth Cam Model G26NG from Sam's Club on July 31, 2014. This blog post will serve as a place for the review of this unit. We will continue adding photos and narrative regarding the unit as the review process evolves.
Sam's sells "game cameras" each summer as a "seasonal item." The cameras are usually placed on an end cap near other hunting-related items in Sam's pseudo-sporting goods department. This summer, we noted the cameras shortly after July 4th. We almost missed out on this camera as the inventory shrunk by about 2/3rds between early and late July.
Originally, the supply of this particular game cameras filled an entire end cap and spanned two pallets!
After getting the unit home, we used an X-acto knife to carefully and surgically cut open the stubborn blister pack material. By using this technique to extract the camera unit, we keep the packaging looking pristine and "resalable" in case we need to return the unit within the 90-day window.
Above, the X-acto cuts have already been made but appear almost invisible in this photo. Below, the camera comes right out and the blister pack remains intact. Under no circumstances will we use the included batteries, SD card or strap. By leaving those accessories intact in their packaging, it's easy to make a case that we would be returning the camera unused should the need arise. Hopefully, we can find the manual online and no have to extract and unfold the included manual.
Below you can see the camera in its first "state-of-inspection." The first thing we noticed and disliked is there appears to be no protection for the lens. The LED lights are behind some protection but not the lens, as you can easily see by the second photo below.
Once we find 8 AA batteries and one of our many spare SD cards, this review process will continue. Stay tuned.
The manual for this model is located here:
http://www.gsmoutdoors.com/downloads/61/stealth-cam-2013-2014-manuals/ It's 5.5 megs and a very fast download in PDF format. There's 20-something pages of info in the manual. The rest of the manual appears to be in one or more foreign languages.
Sam's sells "game cameras" each summer as a "seasonal item." The cameras are usually placed on an end cap near other hunting-related items in Sam's pseudo-sporting goods department. This summer, we noted the cameras shortly after July 4th. We almost missed out on this camera as the inventory shrunk by about 2/3rds between early and late July.
Originally, the supply of this particular game cameras filled an entire end cap and spanned two pallets!
After getting the unit home, we used an X-acto knife to carefully and surgically cut open the stubborn blister pack material. By using this technique to extract the camera unit, we keep the packaging looking pristine and "resalable" in case we need to return the unit within the 90-day window.
Above, the X-acto cuts have already been made but appear almost invisible in this photo. Below, the camera comes right out and the blister pack remains intact. Under no circumstances will we use the included batteries, SD card or strap. By leaving those accessories intact in their packaging, it's easy to make a case that we would be returning the camera unused should the need arise. Hopefully, we can find the manual online and no have to extract and unfold the included manual.
Below you can see the camera in its first "state-of-inspection." The first thing we noticed and disliked is there appears to be no protection for the lens. The LED lights are behind some protection but not the lens, as you can easily see by the second photo below.
Once we find 8 AA batteries and one of our many spare SD cards, this review process will continue. Stay tuned.
The manual for this model is located here:
http://www.gsmoutdoors.com/downloads/61/stealth-cam-2013-2014-manuals/ It's 5.5 megs and a very fast download in PDF format. There's 20-something pages of info in the manual. The rest of the manual appears to be in one or more foreign languages.
Saturday, May 10, 2014
Buckaroo Coffee
Stephen Neal Saqui
Buckaroo coffee: Heat water over a Coleman stove. Do not let the water boil, bring it up until it is rolling but not boiling then take it off the heat and spoon two spoons of medium ground coffee (of your choice as long as it's not decaffeinated). Put the cap back on the pot and let it sit. Forget all the lies about salt or eggshell, just let it sit. Go about fixing things to eat with it if you're hungry. When the grounds have settled to the bottom, pour a cup and drink. That's Buckaroo coffee. I have a hand grinder and prefer to grind good roasted beans. Harry Rogan liked Folgers and would scoff at my way but he would drink my coffee and I his. Now there's another thing about Buckaroo coffee...in the Nevada Mountains one might be out prospecting or walking (some call it hiking) and when returning to camp one ALWAYS makes a pot of Buckaroo coffee. That's how it's done. You noticed I didn't say what size spoon? Pick one.
Thursday, May 8, 2014
Creating Space
| We keep a lot of old OSB and scrap lumber around to tinker with rigging our camping gear each year. |
For each year's camping season, we always reinvent our wheel. We always create new space. We always come up with a different way to use the same blank palette. It's been that way for 50+ years and there's every reason to believe it will be that way until we pass on to the Great Campground in The Sky.
This year we wanted to solve a vexing problem with the way we packed our 1984 Nissan short bed last season. As everyone who camps knows, you get done with certain things last. It would help if the last things you use in the morning go into the truck last instead of first!
This year, we think we finally got it right. Of course, we say that EVERY year but, really, we might have it right this year.
As everyone knows, plastic tubs are the mainstay of our camp rigging. These tubs sell at Wal-Mart for $5 or less. There are four sizes. Really small, small, large and really large. We don't use the really large ones, only the first three sizes.
Anyway, the tubs are tapered so that they can stack easily. This means they are MUCH wider at the top than they are at the bottom. If you put a spacer under a tub to elevate it, you can often make the tubs fit nicer in your blank palette. Generally, we've always used a piece of OSB on top of a 2x2 for a spacer.
| POOF, Creating Space! |
This year, we finally got decided to actually create space by combining the "Spacer Concept" with a brand new way to rig the back of the truck.
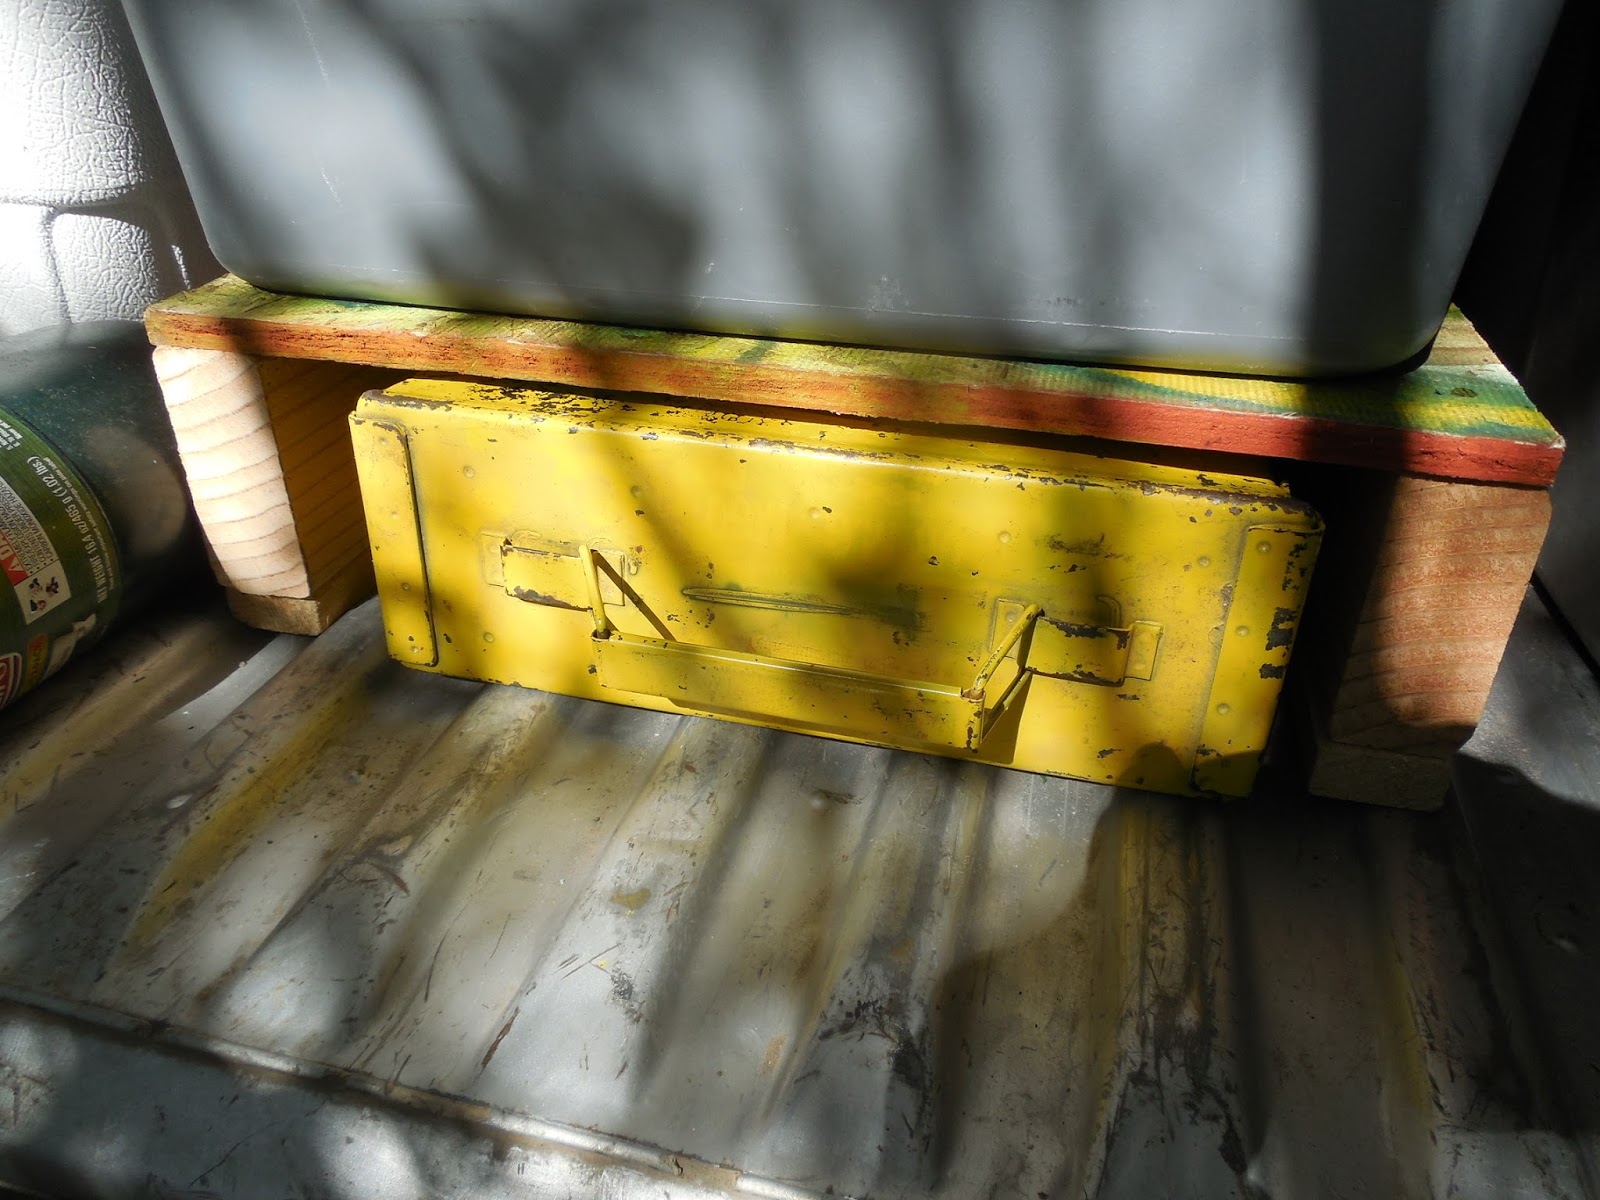
Lo and behold, we created some really fun space. We can actually place three .30 caliber ammo cans in our newly created space, PLUS our Bug Box. In addition, four of the small tubs fit perfectly in a space they simply wouldn't fit before. Meanwhile, there's now space for the tarp, groundsheet and trash to go in last.
This is huge because, prior to creating space today, the back of the pickup bed really didn't work all that well. Now it works like a Swiss watch.
The moral of this story is to look at whatever blank palette you have with "fresh eyes." Try to see new, unique and different possibilities. Think in three dimensions. Don't be afraid to shake it up and reinvent how you store your stuff. There's almost always a better way of creating space.
Not only do four small tubs now fit between the cooler and the stove, we have space for 3 ammo cans.
The portable CB radio finally gets stored in a quickly accessible spot. The fire tools fit on one side and the hiking sticks fit on the other. A 50 caliber can will go on top of the CB. The groundsheet will fit in the big space on the right and trash in the middle on top of the Bug Box. The tarp lays down on top of the two boxes on the right.
So what are in the four tubs? The two tubs in the middle are Kitchen Stuff. One is pots and pans and coffee stuff. The other is food that doesn't need to be in a cooler. The two tubs at right are our own personal clothing boxes, one for each of us.
All the overnight stuff (tent, sleeping bags, pillows, foam pads, etc.) goes up front on top of the safety gear.
Corn cakes
| YUM! Agave syrup, butter, yogurt and chopped walnuts on top of a corn cake. |
One of the things campers always bake is cornbread. Cornbread is a very reliable Ol' Camping Sidekick that probably dates back 200 or more years.
But what if you don't want to bake? What if you want to have a "corn fix" without baking? Well, Corn Cakes can ride to the rescue.
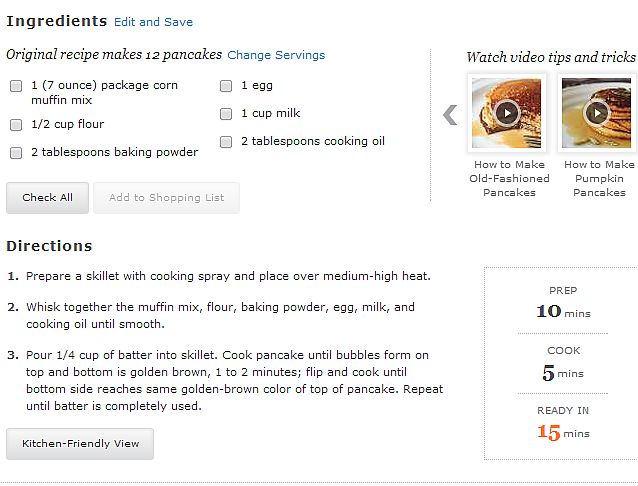
A local grocery put corn muffin premix on sale this week for 33 cents each in a 6.5 ounce package. We became curious and Googled "can you make corn cakes out of corn muffin mix." Sure enough, we found a recipe. This morning we tested it out. It was a home run ball. We both loved the corn cakes. So, now we have a new way to have a "corn fix" without baking. The corn cakes taste a lot like corn muffins or corn bread only they are better. Plus, corn cakes can be whipped up in practically no time at all. That means no preheating of a dutch oven or camp oven. And no waiting while the concoction bakes for upwards of 20 minutes. Nope, it's almost instant gratification with corn cakes. We love 'em and already want more of 'em.
The recipe is really simple. Here is the link to it. In case the link stops working, we've also put up a screen shot of the recipe below the link. Enjoy!
http://allrecipes.com/recipe/corn-muffin-pancakes/
Monday, May 5, 2014
When Bigger Is Better
Each and every year we concoct a different Kitchen Rig. Each and every year since 2010, the Kitchen Rig has been centered around a Coleman 425F stove. The 425F is the small two burner, lightweight model.
We started out yesterday thinking that the 425F was once again going to be the foundation of our Kitchen Rig. Some strange twists and turns took place yesterday and, as of May 5, we've completely upended redesigned and restocked our Kitchen Rig.
It all started when we decided to get rid of our Coleman 426D 3-burner stove. We list it on eBay and also our local Craigs List and spent most of the day lamenting no one bid on the 1978 behemoth. We have about 18 photos in this blog post and the story is best told with captions beneath each picture.
Here's the Coleman 426D that we fully intended to sell on May 4th. We bought it perhaps 3-4 years ago and it's just been sitting in the Cook Shack taking up space and getting in the way. Yes, it needs a good cleanup but we figured we'd price it low and just get it OUTTA HERE!
Later in the evening May 4th, we decided to take a good close look at our Coleman stove inventory. The stove at left is the 425F. The 462D is in the foreground and the 413D is at right.
Here's our venerable, yeoman 425F. The large burner measures 60 millimeters in diameter. The 413D's burner measures 62.5 millimeters but burns MUCH hotter than the 425F. The 426D's main burner is also 60 mm and the two side burners are smaller.
Here's what really tipped the scales to a new Kitchen Rig this season--our discovery that the 426D 3-burner would fit perfectly in the back right rear area of Marvie--our camping truck. The 426D fist so well there it's incredible. It snaps into place and I can drive around town without the stove flying all over the back of the truck bed.
As you can see, this is how we stowed the 425F last season. It takes up "most" of the same space but unfortunately, there's really nothing much we can do with the remaining space. When we realized the 426D would make maximum, optimal usage of that space, we were hooked. We immediately ran in the house and ended our eBay auction and deleted the Craigs List ad.
We also knew right away that we'd finally have some elbow room in the 426D. Above is how cramped it has been packing the 425F. It's always a "trick" to make everything fit. Also, the spare fuel canister has to be stowed in a place that's difficult to access.
This morning we were very happy to see hoe much room we had in the 426D. TONS of space!
So much space we can now carry two of our favorite spatulas. Our normal "UTES" box for kitchen utensils is a 30 caliber ammo can. No way can a decent spatula fit in a 30 caliber ammo can.
Not only that, but we also immediately realized we can once again start carrying a griddle that will fit the 426D perfectly and still ahve room to use another burner.
And not only that but the griddle fits INSIDE the stove! YEA!
Our "go to" bacon cooking rig just won't fit well on the 425F and doesn't fit all that well on the 413D either. However, it fits GREAT on the 426D.
Both the griddle and the big Lodge cast iron skillet look like a match made in Heaven on this stove.
We swapped out our small coffee pot for a much larger version.
The surface area of the 426D is so large the possibilities seem endless.
Here's a small wok, a stainless skillet and a griddle, too.
We began to see endless permutations and combinations of various cookware that we had never considered possible or practical before. We're still working on which pots, pans and skillets we intend to pack for this season's Kitchen Rig. We will post up a final inventory once we know what it is.
We started out yesterday thinking that the 425F was once again going to be the foundation of our Kitchen Rig. Some strange twists and turns took place yesterday and, as of May 5, we've completely upended redesigned and restocked our Kitchen Rig.
It all started when we decided to get rid of our Coleman 426D 3-burner stove. We list it on eBay and also our local Craigs List and spent most of the day lamenting no one bid on the 1978 behemoth. We have about 18 photos in this blog post and the story is best told with captions beneath each picture.
Here's the Coleman 426D that we fully intended to sell on May 4th. We bought it perhaps 3-4 years ago and it's just been sitting in the Cook Shack taking up space and getting in the way. Yes, it needs a good cleanup but we figured we'd price it low and just get it OUTTA HERE!
Later in the evening May 4th, we decided to take a good close look at our Coleman stove inventory. The stove at left is the 425F. The 462D is in the foreground and the 413D is at right.
Here's our venerable, yeoman 425F. The large burner measures 60 millimeters in diameter. The 413D's burner measures 62.5 millimeters but burns MUCH hotter than the 425F. The 426D's main burner is also 60 mm and the two side burners are smaller.
Here's what really tipped the scales to a new Kitchen Rig this season--our discovery that the 426D 3-burner would fit perfectly in the back right rear area of Marvie--our camping truck. The 426D fist so well there it's incredible. It snaps into place and I can drive around town without the stove flying all over the back of the truck bed.
As you can see, this is how we stowed the 425F last season. It takes up "most" of the same space but unfortunately, there's really nothing much we can do with the remaining space. When we realized the 426D would make maximum, optimal usage of that space, we were hooked. We immediately ran in the house and ended our eBay auction and deleted the Craigs List ad.
We also knew right away that we'd finally have some elbow room in the 426D. Above is how cramped it has been packing the 425F. It's always a "trick" to make everything fit. Also, the spare fuel canister has to be stowed in a place that's difficult to access.
This morning we were very happy to see hoe much room we had in the 426D. TONS of space!
So much space we can now carry two of our favorite spatulas. Our normal "UTES" box for kitchen utensils is a 30 caliber ammo can. No way can a decent spatula fit in a 30 caliber ammo can.
Not only that, but we also immediately realized we can once again start carrying a griddle that will fit the 426D perfectly and still ahve room to use another burner.
And not only that but the griddle fits INSIDE the stove! YEA!
Our "go to" bacon cooking rig just won't fit well on the 425F and doesn't fit all that well on the 413D either. However, it fits GREAT on the 426D.
Both the griddle and the big Lodge cast iron skillet look like a match made in Heaven on this stove.
We swapped out our small coffee pot for a much larger version.
The surface area of the 426D is so large the possibilities seem endless.
Here's a small wok, a stainless skillet and a griddle, too.
Thursday, February 20, 2014
Potassium and Tomatoes
No take a Lookie at Sun Dried Tomatoes. The nutrition facts below are for a 100 gram serving so it's easy to divide any of the values by 100 to get the content per gram. ONE GRAM of sun dried tomato has about 40% more Potassium that eight ounces of Gatorade! That's incredible.
We've always known cooked tomatoes contain mind-boggling amounts of Potassium. Ditto with canned tomato juice. One V-8 each day when we're car camping pretty well takes care of my potassium needs for a full 24 hours. Carrying sun dried tomatoes on a backpack trip is the next best thing to having canned stewed tomatoes or canned V-8 juice.
We bought a package of California-produced sun dried tomatoes and split it four ways. One fourth of the dried tomatoes was chopped and cut up to use in our dinner recipes. The other three portions will be used each day of our hike. Each of those portions will provide about 650 milligrams of Potassium each day.
Coupled with the other potassium-rich food we bought for this trip, we're going to be fine as far as this important mineral goes.
xxx
| ||||||||||||||||||||||||||||||||||||||||||||||||||||||||||||||||||||||||||||||||
| ||||||||||||||||||||||||||||||||||||||||||||||||||||||||||||||||||||||||||||||||
| ||||||||||||||||||||||||||||||||||||||||||||||||||||||||||||||||||||||||||||||||
| ||||||||||||||||||||||||||||||||||||||||||||||||||||||||||||||||||||||||||||||||
| ||||||||||||||||||||||||||||||||||||||||||||||||||||||||||||||||||||||||||||||||
| ||||||||||||||||||||||||||||||||||||||||||||||||||||||||||||||||||||||||||||||||
| ||||||||||||||||||||||||||||||||||||||||||||||||||||||||||||||||||||||||||||||||
| ||||||||||||||||||||||||||||||||||||||||||||||||||||||||||||||||||||||||||||||||
Coffee Cravin'
I drink coffee. I Love Coffee. I crave coffee. OK? OK!
So, here we go on a short backpack trip. What's one of the first things a Coffee Cravin', Coffee Lovin' Coffee Drinker to do, huh? Why, make certain we can get our Coffee Fix each morning we're in The Canyon. Each of the photos has a caption below and there is more narrative below all of the photos.
Believe it or not, Wal-Mart sells the best instant coffee at the best price anywhere. Of course saying it's "the best" is subjective but lookie there at the price--ONE DOLLAR for enough instant coffee to make 32 eight ounce cups! You may disagree that it's the "the best" but you can't possibly disagree that it's the best price!
This instant coffee is made in Mexico. The Mexicans have a LONG Love Affair with instant coffee and those people South of The Border really know how to make a potent freeze dried dose-o-caffeine. When you're looking at instant coffee, you definitely want to see "100% Instant Coffee" on the label. As everyone knows, the trouble with ALL instant coffees is that taste like, well, instant coffee. So what to do?
Enter our Dear Swiss Miss. This Miss has been a mainstay of our Camping Coffee for longer than we can remember. The best way to mask the instant coffee taste is to mix the granules with Good Ol' Swiss Miss. Trust me, use the full sugar mix--not the sugar free mix. You will be amazed at how wonderful instant coffee becomes when mixed properly with hot chocolate.
As most everyone knows, typical hot chocolate is essentially caffeine free. Bummer.
If you look at the hot chocolate label, there's a lot more than sugar in there. It's that saturated fat that really is a Game Changer and makes a cuppa camp joe so danged much fun in the morning. Hot chocolate is also a nice bonus source of potassium, which we consider an essential Hiking Mineral.
The first task is to CAREFULLY cut off the top of a hot chocolate envelope making sure you are at the tippy top of the opening. Second, pour the powder into a quarter cup measure. Stainless steel works better than plastic. Then gently bang the bottom of the steel on the counter top to settle the chocolate powder as much as possible. Then, top off the quarter cup measure with instant coffee and use a knife to make sure it is a level measure.
Then pour this mix into a bowl. Imagine using a mortar and pestle to get a better mix that goes into solution easier. That's the goal here. Mix thoroughly.
After a VERY thorough mixing of the two ingredients, the coffee should have Become One with the Cocoa.
Next, we carefully spooned the mix from the bowl back into the original envelope, carefully rolled down the top much the way a river runner rolls down the top of a dry bag and sealed with a small piece of transparent tape. The weight of each package varied slightly.
Our trusty 1.7 ounce cup and our little six ounce pot. (Weights--not capacities.)
And, the fruit of our labor! A steaming cup of really yummy, fully-charged coffee.
We did quite a bit of mathematics on this process. First, we weighed the unopened packet of hot chocolate. It calc'd to .80 ounce. (Eight tenths of an ounce.) Then we weighed each packet afterwards and then weighed all four packets together to get a true average weight.
Then we studied the two websites below. Basically, without going into farther detail, we will be getting at least 350 milligrams of coffee each morning and that's plenty for us. We are very pleased with the fruits of our labor.
http://www.caffeineinformer.com/caffeine-content/coffee-instant
Subscribe to:
Posts (Atom)